Skipp_Test.py
data = ['tab1', 'tab2', 'tab3', 'tab4', 'tab5', 'tab6', 'tab7']
skip_table = True
for d in data:
    if skip_table and d != 'tab3':
        continue
    skip_table = False
    print(d)
Skipp_Test.py
data = ['tab1', 'tab2', 'tab3', 'tab4', 'tab5', 'tab6', 'tab7']
skip_table = True
for d in data:
if skip_table and d != 'tab3':
continue
skip_table = False
print(d)
import argparse
parser = argparse.ArgumentParser(description="Flip a switch by setting a flag")
parser.add_argument('-skip', action='store_true')
where
action='store_true'impliesdefault=False.Conversely, you could have
action='store_false', which impliesdefault=True.
parser.add_argument('-foo', action='store_const', const=42)
args = parser.parse_args()
print(args.skip)
print(args.foo)
Execution :
python myparser.py
>> False
>> None
python myparser.py -skip
>> True
>> None
python myparser.py -skip -foo
>> True
>>42
python myparser.py -foo>> False
import logging
# This sets the root logger to write to stdout (your console).
# Your script/app needs to call this somewhere at least once.
#logging.basicConfig()

# By default the root logger is set to WARNING and all loggers you define
# inherit that value. Here we set the root logger to NOTSET. This logging
# level is automatically inherited by all existing and new sub-loggers
# that do not set a less verbose level.
logging.root.setLevel(logging.NOTSET)

# The following line sets the root logger level as well.
# It's equivalent to both previous statements combined:
#logging.basicConfig(level=logging.NOTSET)


logger = logging.getLogger("my-app")
f_handler = logging.FileHandler('main-file.log')
f_handler.setLevel(logging.INFO)
f_format = logging.Formatter('%(asctime)s - %(name)s - %(levelname)s - %(message)s')
f_handler.setFormatter(f_format)
logger.addHandler(f_handler)


# Convenient methods in order of verbosity from highest to lowest
logger.debug("this will get printed")
logger.info("this will get printed")
logger.warning("this will get printed")
logger.error("this will get printed")
logger.critical("this will get printed")
name = 'John'
logger.info('%s raised an error', name)
logger.info('%s raised an information',name)

a = 5
b = 0

try:
  c = a / b
except Exception as e:
  logger.error("Exception occurred", exc_info=True)

a = 5
b = 0
try:
  c = a / b
except Exception as e:
  logger.exception("Exception occurred")

# In large applications where you would like more control over the logging,
# create sub-loggers from your main application logger.
component_a_logger = logger.getChild("component-a")
f_component_a_handler = logging.FileHandler('compoment_a-file.log')
f_component_a_handler.setLevel(logging.ERROR)
f_component_a_handler.setFormatter(f_format)
component_a_logger.addHandler(f_component_a_handler)
component_a_logger.info("INFO: this will get printed with the prefix `my-app.component-a`")
component_a_logger.error("ERROR: this will get printed with the prefix `my-app.component-a`")

# If you wish to control the logging levels, you can set the level anywhere
# in the hierarchy:
#
# - root
#   - my-app
#     - component-a
#


# In large applications where you would like more control over the logging,
# create sub-loggers from your main application logger.
component_b_logger = logger.getChild("component-b")
f_component_b_handler = logging.FileHandler('compoment_b-file.log')
f_component_b_handler.setLevel(logging.ERROR)
f_component_b_handler.setFormatter(f_format)
component_b_logger.addHandler(f_component_b_handler)
component_b_logger.info(" INFO: this will get printed with the prefix `my-app.component-b`")
component_b_logger.error("ERROR: this will get printed with the prefix `my-app.component-b`")

# If you wish to control the logging levels, you can set the level anywhere
# in the hierarchy:
#
# - root
#   - my-app
#     - component-b
#


'''
# Example for development:
logger.setLevel(logging.DEBUG)

# If that prints too much, enable debug printing only for your component:
component_logger.setLevel(logging.DEBUG)

# For production you rather want:
logger.setLevel(logging.WARNING)
'''
To open a file, you need to use the built-in open function. The Python file open function returns a file object that contains methods and attributes to perform various operations for opening files in Python.
Syntax of Python open file function
file_object = open("filename", "mode")Here,
More details of these modes are explained below
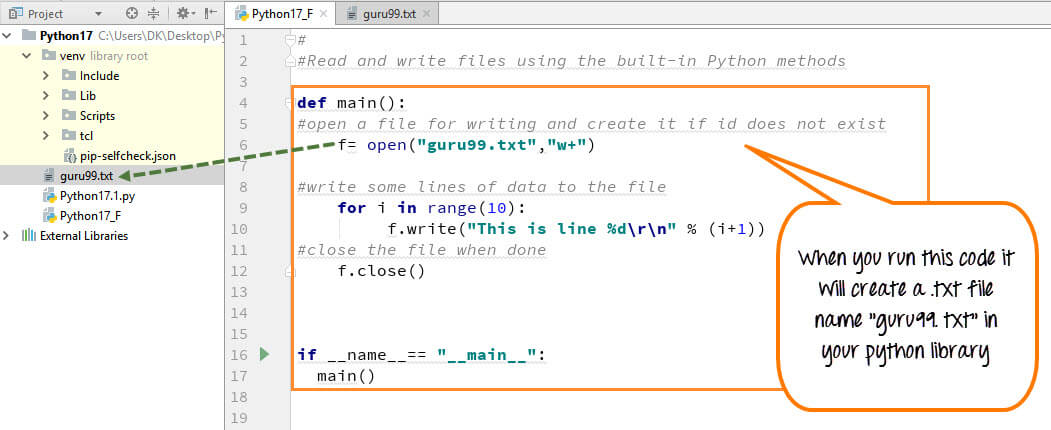
With Write to file Python, you can create a .text files (guru99.txt) by using the code, we have demonstrated here:
Step 1) Open the .txt file
f= open("guru99.txt","w+")Step 2) Enter data into the file
for i in range(10):
f.write("This is line %d\r\n" % (i+1))Step 3) Close the file instance
f.close()
Here is the result after code execution for create text file in Python example:
How to Create a Text File in Python
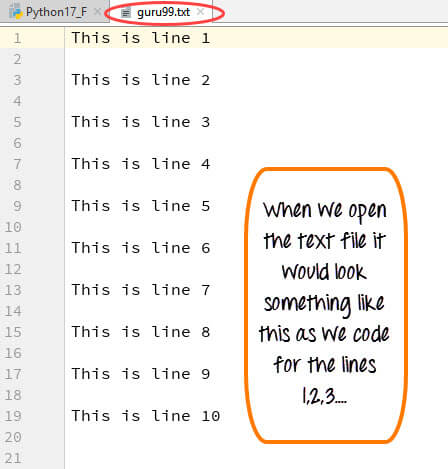
When you click on your text file in our case “guru99.txt” it will look something like this
Example of how to create a text file in Python
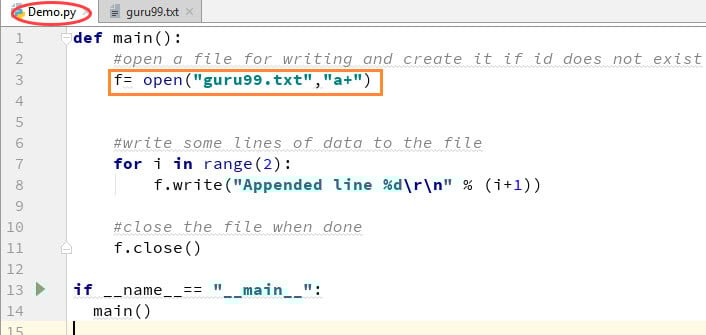
You can also append/add a new text to the already existing file or a new file.
Step 1)
f=open("guru99.txt", "a+")Once again if you could see a plus sign in the code, it indicates that it will create a new file if it does not exist. But in our case we already have the file, so we are not required to create a new file for Python append to file operation.
Step 2)
for i in range(2):
     f.write("Appended line %d\r\n" % (i+1))
This will write data into the file in append mode.
How to Append Text File in Python
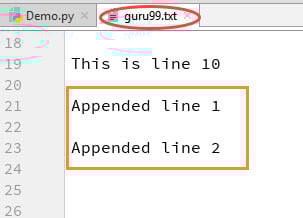
You can see the output in “guru99.txt” file. The output of the code is that earlier file is appended with new data by Python append to file operation.
Example of How to Append Text File in Python
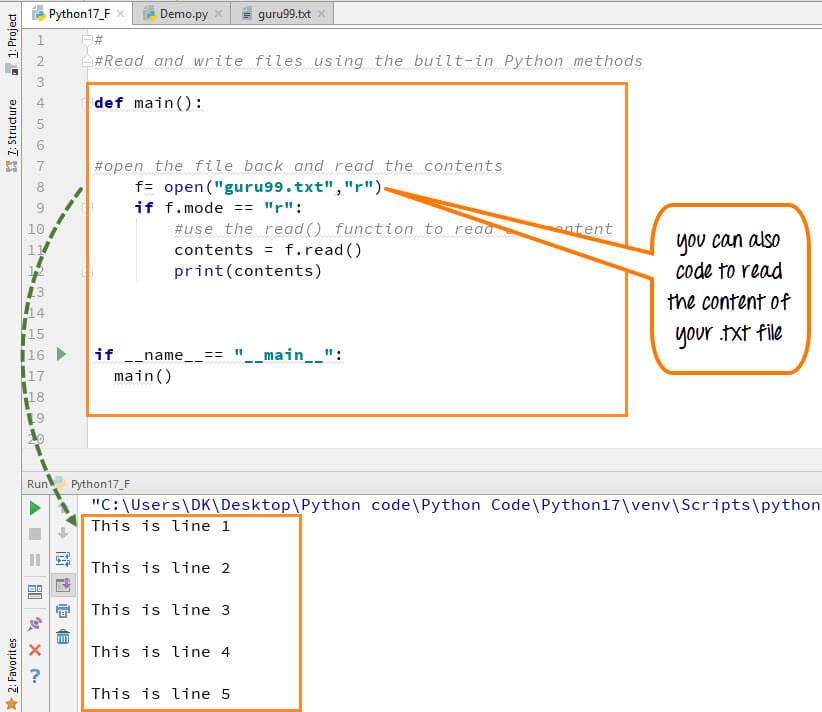
Step 1) Open the file in Read mode
f=open("guru99.txt", "r")Step 2) We use the mode function in the code to check that the file is in open mode. If yes, we proceed ahead
if f.mode == 'r':
Step 3) Use f.read to read file data and store it in variable content for reading files in Python
contents =f.read()
Step 4) Print contents for Python read text file
Here is the output of the read file Python example:
How to Read Files in Python
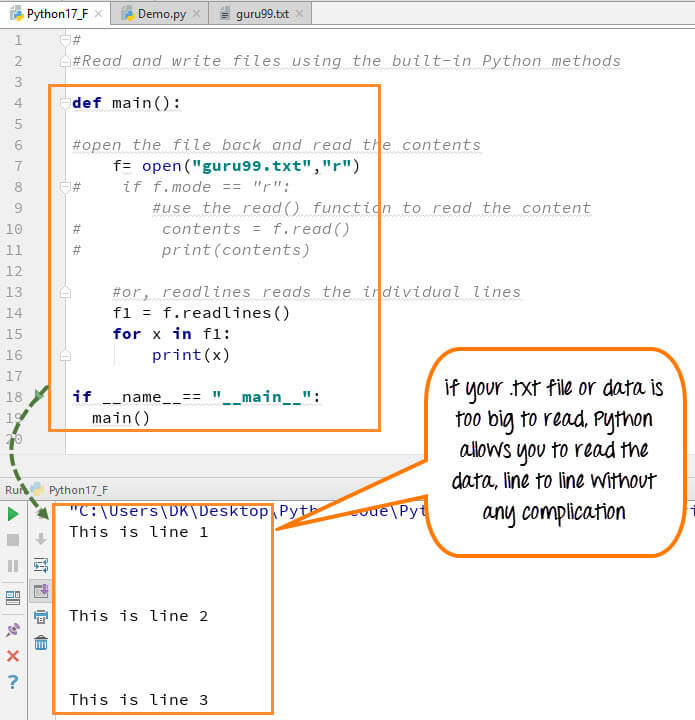
You can also read your .txt file line by line if your data is too big to read. readlines() code will segregate your data in easy to read mode.
How to Read a File line by line in Python
When you run the code (f1=f.readlines()) to read file line by line in Python, it will separate each line and present the file in a readable format. In our case the line is short and readable, the output will look similar to the read mode. But if there is a complex data file which is not readable, this piece of code could be useful.
Following are the various File Modes in Python:
| Mode | Description |
|---|---|
| ‘r’ | This is the default mode. It Opens file for reading. |
| ‘w’ | This Mode Opens file for writing. If file does not exist, it creates a new file. If file exists it truncates the file. |
| ‘x’ | Creates a new file. If file already exists, the operation fails. |
| ‘a’ | Open file in append mode. If file does not exist, it creates a new file. |
| ‘t’ | This is the default mode. It opens in text mode. |
| ‘b’ | This opens in binary mode. |
| ‘+’ | This will open a file for reading and writing (updating) |
Here is the complete code for Python print() to File Example
Python 2 Example
def main():
     f= open("guru99.txt","w+")
     #f=open("guru99.txt","a+")
     for i in range(10):
         f.write("This is line %d\r\n" % (i+1))
     f.close()
     #Open the file back and read the contents
     #f=open("guru99.txt", "r")
     #   if f.mode == 'r':
     #     contents =f.read()
     #     print contents
     #or, readlines reads the individual line into a list
     #fl =f.readlines()
     #for x in fl:
     #print x
if __name__== "__main__":
  main()
Python 3 Example
Below is another Python print() to File Example:
def main():
    f= open("guru99.txt","w+")
    #f=open("guru99.txt","a+")
    for i in range(10):
         f.write("This is line %d\r\n" % (i+1))
    f.close()
    #Open the file back and read the contents
    #f=open("guru99.txt", "r")
    #if f.mode == 'r':
    #   contents =f.read()
    #    print (contents)
    #or, readlines reads the individual line into a list
    #fl =f.readlines()
    #for x in fl:
    #print(x)
if __name__== "__main__":
main()here's some sample code that demonstrates a merge operation on a Delta table using PySpark: from pyspark.sql import SparkSession # cre...