Just try and check the answers, do not wast time . Without trying we do not know the answers
Monday, December 26, 2022
Monday, April 25, 2022
JDBC - Data type Mapping for Snowflake
It is important to understand how we map various JDBC data types for the Snowflake data types.
| BIT | BOOLEAN |
| TINYINT | SMALLINT |
| SMALLINT | SMALLINT |
| INTEGER | INTEGER |
| BIGINT | BIGINT |
| FLOAT | FLOAT |
| REAL | FLOAT |
| DECIMAL(m,n) | NUMBER(m,n) |
| NUMERIC(m,n) | NUMBER(m,n) |
| DOUBLE | FLOAT |
| CHAR(m) | CHAR(m) |
| LONGVARCHAR | STRING |
| LONGNVARCHAR | STRING |
| NCHAR(m) | STRING |
| NVARCHAR | VARCHAR(m) |
| VARCHAR(m) | VARCHAR(m) |
| DATE | DATE |
| TIME | TIMESTAMP |
| TIMESTAMP | TIMESTAMP |
| ARRAY | STRING |
| BINARY | BINARY |
| VARBINARY | BINARY |
| LONGVARBINARY | BINARY |
| JAVA_OBJECT | STRING |
| BLOB | BINARY |
| CLOB | STRING |
| NCLOB | STRING |
| STRUCT | STRING |
| REF | STRING |
| BOOLEAN | BOOLEAN |
| ROWID | STRING |
| SQLXML | STRING |
| OTHER | STRING |
| NULL | STRING |
| DISTRICT | STRING |
| DATALINK | STRING |
How-to-generate-log-file-on-Snowflake-connector- SnowSQL
SnowSQL
- What is the Snowflake SnowSQL version?
> snowsql --version
> snowsql --bootstrap-version
> snowsql --versions
- Is it reproducible with the latest SnowSQL version?
- Is SnowSQL used interactively or in a batch script?
- Generate log files:
- Add -o log_level=DEBUG to the usual command line arguments, or if you prefer to do it in the SnowSQL config file, update log_level=DEBUG:
- Linux or Mac: ~/.snowsql/config
- Windows: %USERPROFILE%\.snowsql\config
- If you're generating DEBUG level logs to troubleshoot a specific issue, you might consider creating a separate logfile while reproducing this issue. This can be done with adding -o log_file, such as:
- Linux or Mac: snowsql -o log_level=DEBUG -o log_file=/path/to/snowsql_debug.log <rest of the usual arguments>
- Windows: snowsql.exe -o log_level=DEBUG -o log_file=C:\Temp\snowsql_debug.log <rest of the usual arguments>
- Add -o log_level=DEBUG to the usual command line arguments, or if you prefer to do it in the SnowSQL config file, update log_level=DEBUG:
- Collect log files:
- Linux or Mac: ~/.snowsql/log*
- Windows: %USERPROFILE%\.snowsql\log*
- or if using log_file, collect the logfile from the path specified in log_file. E.g. C:\Temp\snowsql_debug.log in the above example.
- Documentation reference:
Tuesday, April 19, 2022
replace_inside_parentheses
Code
def replace_inside_parentheses(string, find_string, replace_string):
    bracket_count = 0
    return_string = ""
    for a in string:
        if a == "(":
            bracket_count += 1
        elif a == ")":
            bracket_count -= 1
        if bracket_count > 0:
            return_string += a.replace(find_string, replace_string)
        else:
            return_string += a
    return return_string


my_str = "decimal(12,01)"
print(my_str)
print(replace_inside_parentheses(my_str, ",", "%"))
Friday, April 8, 2022
spark salting technique explained
the fallowing is for spark salting technique
var df1 = Seq((1,"a"),(2,"b"),(1,"c"),(1,"x"),(1,"y"),(1,"g"),(1,"k"),(1,"u"),(1,"n")).toDF("ID","NAME")
df1.createOrReplaceTempView("fact")
var df2 = Seq((1,10),(2,30),(3,40)).toDF("ID","SALARY")
df2.createOrReplaceTempView("dim")
val salted_df1 = spark.sql("""select concat(ID, '_', FLOOR(RAND(123456)*19)) as salted_key, NAME from fact """)
salted_df1.createOrReplaceTempView("salted_fact")
# remember that explode array should start with 0 and end with whatever the values we mentioned in the above flor and rand
val exploded_dim_df = spark.sql(""" select ID, SALARY, explode(array(0,1,2,3,4,5,6,7,8,9,10,11,12,13,14,15,16,17,18,19)) as salted_key from dim""")
//val exploded_dim_df = spark.sql(""" select ID, SALARY, explode(array(0 to 19)) as salted_key from dim""")
exploded_dim_df.createOrReplaceTempView("salted_dim")
val result_df = spark.sql("""select split(fact.salted_key, '_')[0] as ID, dim.SALARY
from salted_fact fact
LEFT JOIN salted_dim dim
ON fact.salted_key = concat(dim.ID, '_', dim.salted_key) """)
display(result_df)
Wednesday, April 6, 2022
Python printing the log in console
import logging
logger = logging.getLogger("Dev")
logger.setLevel(logging.INFO)

consoleHandler = logging.StreamHandler()
consoleHandler.setLevel(logging.INFO)
formatter = logging.Formatter('%(asctime)s - %(name)s - %(levelname)s - %(message)s')
consoleHandler.setFormatter(formatter)

logger.addHandler(consoleHandler)

logger.info("This is printing in console")
Thursday, March 31, 2022
Skip some values in array and continue from the value given
Skipp_Test.py
data = ['tab1', 'tab2', 'tab3', 'tab4', 'tab5', 'tab6', 'tab7']
skip_table = True
for d in data:
    if skip_table and d != 'tab3':
        continue
    skip_table = False
    print(d)
Python argparse command line flags without arguments
import argparse
parser = argparse.ArgumentParser(description="Flip a switch by setting a flag")
parser.add_argument('-skip', action='store_true')
where
action='store_true'impliesdefault=False.Conversely, you could have
action='store_false', which impliesdefault=True.
parser.add_argument('-foo', action='store_const', const=42)
args = parser.parse_args()
print(args.skip)
print(args.foo)
Execution :
python myparser.py
>> False
>> None
python myparser.py -skip
>> True
>> None
python myparser.py -skip -foo
>> True
>>42
python myparser.py -foo>> False
Logging_Example_Explanation --- import logging
import logging
# This sets the root logger to write to stdout (your console).
# Your script/app needs to call this somewhere at least once.
#logging.basicConfig()

# By default the root logger is set to WARNING and all loggers you define
# inherit that value. Here we set the root logger to NOTSET. This logging
# level is automatically inherited by all existing and new sub-loggers
# that do not set a less verbose level.
logging.root.setLevel(logging.NOTSET)

# The following line sets the root logger level as well.
# It's equivalent to both previous statements combined:
#logging.basicConfig(level=logging.NOTSET)


logger = logging.getLogger("my-app")
f_handler = logging.FileHandler('main-file.log')
f_handler.setLevel(logging.INFO)
f_format = logging.Formatter('%(asctime)s - %(name)s - %(levelname)s - %(message)s')
f_handler.setFormatter(f_format)
logger.addHandler(f_handler)


# Convenient methods in order of verbosity from highest to lowest
logger.debug("this will get printed")
logger.info("this will get printed")
logger.warning("this will get printed")
logger.error("this will get printed")
logger.critical("this will get printed")
name = 'John'
logger.info('%s raised an error', name)
logger.info('%s raised an information',name)

a = 5
b = 0

try:
  c = a / b
except Exception as e:
  logger.error("Exception occurred", exc_info=True)

a = 5
b = 0
try:
  c = a / b
except Exception as e:
  logger.exception("Exception occurred")

# In large applications where you would like more control over the logging,
# create sub-loggers from your main application logger.
component_a_logger = logger.getChild("component-a")
f_component_a_handler = logging.FileHandler('compoment_a-file.log')
f_component_a_handler.setLevel(logging.ERROR)
f_component_a_handler.setFormatter(f_format)
component_a_logger.addHandler(f_component_a_handler)
component_a_logger.info("INFO: this will get printed with the prefix `my-app.component-a`")
component_a_logger.error("ERROR: this will get printed with the prefix `my-app.component-a`")

# If you wish to control the logging levels, you can set the level anywhere
# in the hierarchy:
#
# - root
#   - my-app
#     - component-a
#


# In large applications where you would like more control over the logging,
# create sub-loggers from your main application logger.
component_b_logger = logger.getChild("component-b")
f_component_b_handler = logging.FileHandler('compoment_b-file.log')
f_component_b_handler.setLevel(logging.ERROR)
f_component_b_handler.setFormatter(f_format)
component_b_logger.addHandler(f_component_b_handler)
component_b_logger.info(" INFO: this will get printed with the prefix `my-app.component-b`")
component_b_logger.error("ERROR: this will get printed with the prefix `my-app.component-b`")

# If you wish to control the logging levels, you can set the level anywhere
# in the hierarchy:
#
# - root
#   - my-app
#     - component-b
#


'''
# Example for development:
logger.setLevel(logging.DEBUG)

# If that prints too much, enable debug printing only for your component:
component_logger.setLevel(logging.DEBUG)

# For production you rather want:
logger.setLevel(logging.WARNING)
'''
Python File Handling: How to Create Text File, Read, Write, Open
How to Open a Text File in Python
To open a file, you need to use the built-in open function. The Python file open function returns a file object that contains methods and attributes to perform various operations for opening files in Python.
Syntax of Python open file function
file_object = open("filename", "mode")Here,
- filename: gives name of the file that the file object has opened.
- mode: attribute of a file object tells you which mode a file was opened in.
More details of these modes are explained below
ow to Create a Text File in Python
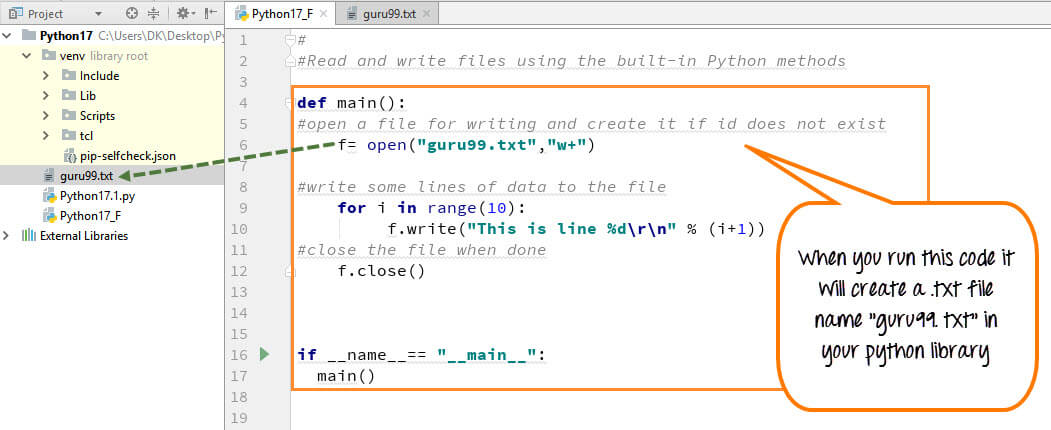
With Write to file Python, you can create a .text files (guru99.txt) by using the code, we have demonstrated here:
Step 1) Open the .txt file
f= open("guru99.txt","w+")- We declared the variable “f” to open a file named guru99.txt. Open takes 2 arguments, the file that we want to open and a string that represents the kinds of permission or operation we want to do on the file
- Here, we used “w” letter in our argument, which indicates Python write to file and it will create file in Python if it does not exist in library
- Plus sign indicates both read and write for Python create file operation.
Step 2) Enter data into the file
for i in range(10):
f.write("This is line %d\r\n" % (i+1))- We have a for loop that runs over a range of 10 numbers.
- Using the write function to enter data into the file.
- The output we want to iterate in the file is “this is line number”, which we declare with Python write file function and then percent d (displays integer)
- So basically we are putting in the line number that we are writing, then putting it in a carriage return and a new line character
Step 3) Close the file instance
f.close()
- This will close the instance of the file guru99.txt stored
Here is the result after code execution for create text file in Python example:
How to Create a Text File in Python
When you click on your text file in our case “guru99.txt” it will look something like this
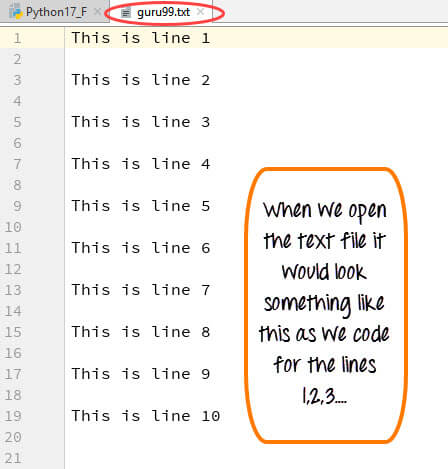
Example of how to create a text file in Python
How to Append Text File in Python
You can also append/add a new text to the already existing file or a new file.
Step 1)
f=open("guru99.txt", "a+")Once again if you could see a plus sign in the code, it indicates that it will create a new file if it does not exist. But in our case we already have the file, so we are not required to create a new file for Python append to file operation.
Step 2)
for i in range(2):
     f.write("Appended line %d\r\n" % (i+1))
This will write data into the file in append mode.

How to Append Text File in Python
You can see the output in “guru99.txt” file. The output of the code is that earlier file is appended with new data by Python append to file operation.
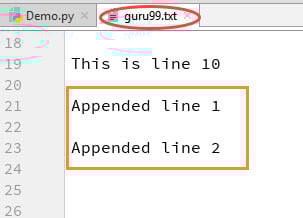
Example of How to Append Text File in Python
Step 1) Open the file in Read mode
f=open("guru99.txt", "r")Step 2) We use the mode function in the code to check that the file is in open mode. If yes, we proceed ahead
if f.mode == 'r':
Step 3) Use f.read to read file data and store it in variable content for reading files in Python
contents =f.read()
Step 4) Print contents for Python read text file
Here is the output of the read file Python example:
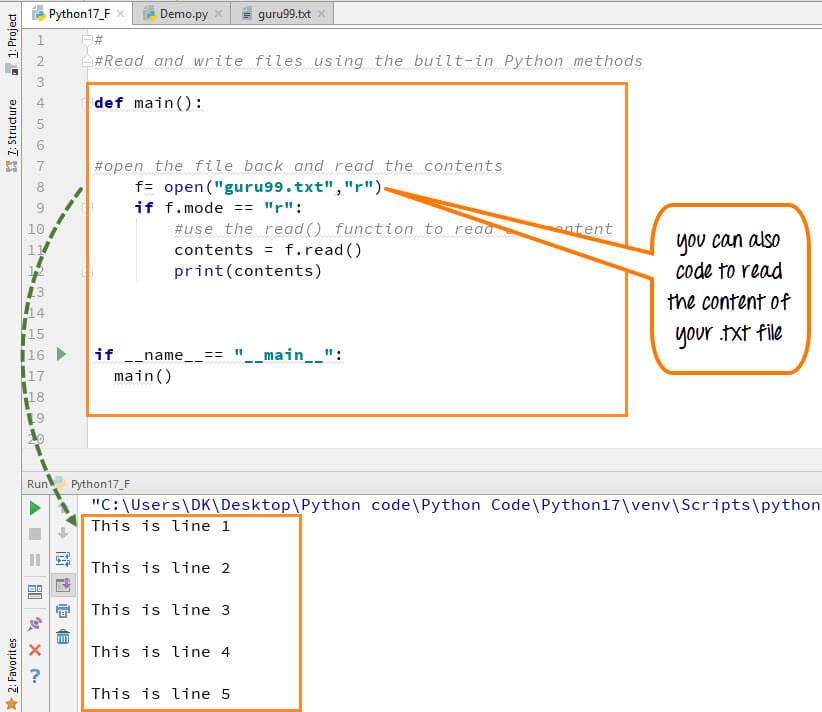
How to Read Files in Python
How to Read a File line by line in Python
You can also read your .txt file line by line if your data is too big to read. readlines() code will segregate your data in easy to read mode.
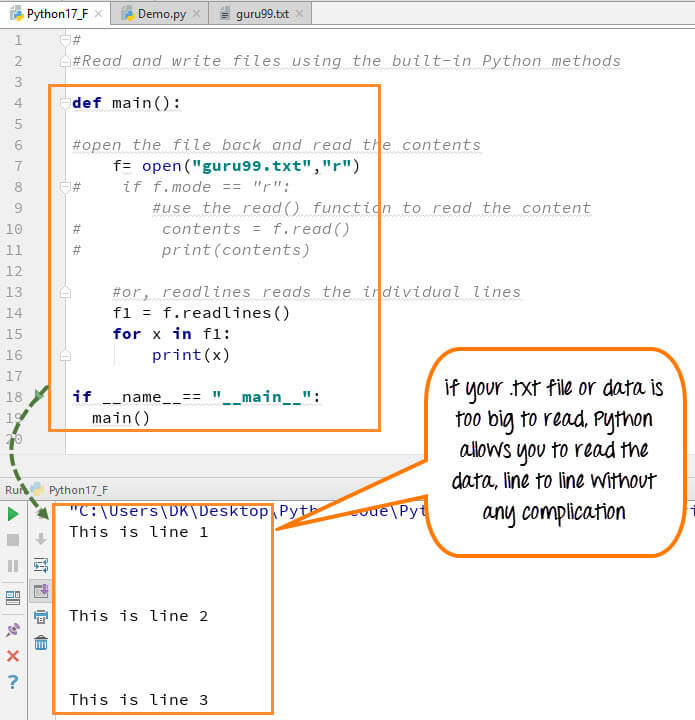
How to Read a File line by line in Python
When you run the code (f1=f.readlines()) to read file line by line in Python, it will separate each line and present the file in a readable format. In our case the line is short and readable, the output will look similar to the read mode. But if there is a complex data file which is not readable, this piece of code could be useful.
File Modes in Python
Following are the various File Modes in Python:
| Mode | Description |
|---|---|
| ‘r’ | This is the default mode. It Opens file for reading. |
| ‘w’ | This Mode Opens file for writing. If file does not exist, it creates a new file. If file exists it truncates the file. |
| ‘x’ | Creates a new file. If file already exists, the operation fails. |
| ‘a’ | Open file in append mode. If file does not exist, it creates a new file. |
| ‘t’ | This is the default mode. It opens in text mode. |
| ‘b’ | This opens in binary mode. |
| ‘+’ | This will open a file for reading and writing (updating) |
Here is the complete code for Python print() to File Example
Python 2 Example
def main():
     f= open("guru99.txt","w+")
     #f=open("guru99.txt","a+")
     for i in range(10):
         f.write("This is line %d\r\n" % (i+1))
     f.close()
     #Open the file back and read the contents
     #f=open("guru99.txt", "r")
     #   if f.mode == 'r':
     #     contents =f.read()
     #     print contents
     #or, readlines reads the individual line into a list
     #fl =f.readlines()
     #for x in fl:
     #print x
if __name__== "__main__":
  main()
Python 3 Example
Below is another Python print() to File Example:
def main():
    f= open("guru99.txt","w+")
    #f=open("guru99.txt","a+")
    for i in range(10):
         f.write("This is line %d\r\n" % (i+1))
    f.close()
    #Open the file back and read the contents
    #f=open("guru99.txt", "r")
    #if f.mode == 'r':
    #   contents =f.read()
    #    print (contents)
    #or, readlines reads the individual line into a list
    #fl =f.readlines()
    #for x in fl:
    #print(x)
if __name__== "__main__":
  main()
Summary
- Python allows you to read, write and delete files
- Use the function open(“filename”,”w+”) for Python create text file. The + tells the python interpreter for Python open text file with read and write permissions.
- To append data to an existing file or Python print to file operation, use the command open(“Filename”, “a“)
- Use the Python read from file function to read the ENTIRE contents of a file
- Use the readlines function to read the content of the file one by one.
Reference :
https://www.guru99.com/reading-and-writing-files-in-python.html
Subscribe to:
Comments (Atom)
-
Step 1: we have check the installed sbt version . if sbt installed version on out laptop is say : 1.3.13 [info] welcome to sbt 1.3.13 ...
-
OpenVPN 2.4 also became the default version your connections use. OpenVPN 2.4 adds many security and performance improvements. Because OpenV...
-
Apache Avro is becoming one of the most popular data serialization formats nowadays, and this holds true particularly for Hadoop-based bi...

